Table of Contents
Why You’ll Love This Recipe
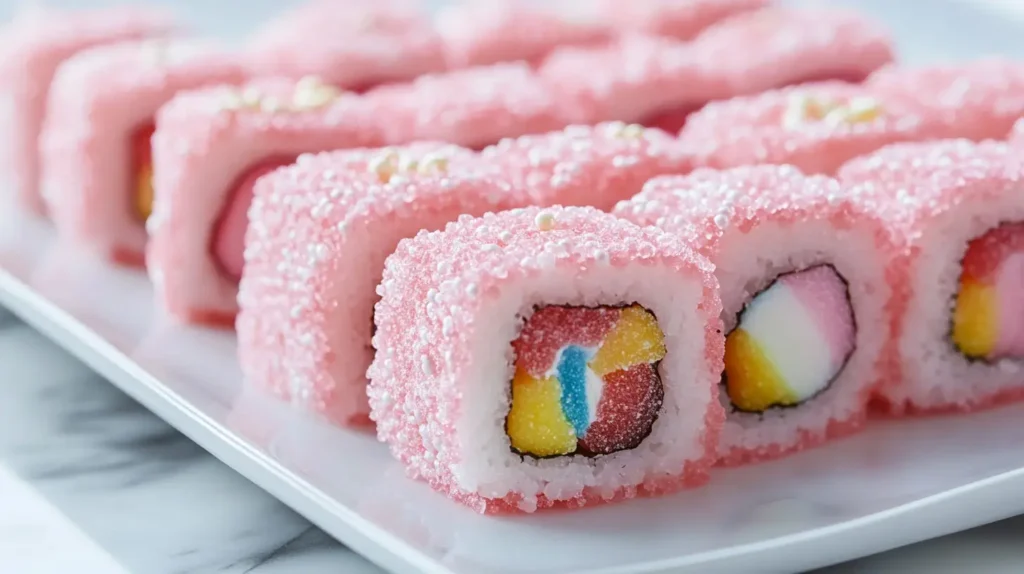
This Cotton Candy Sushi Swirl Candy brings together the whimsical nature of cotton candy with the fun presentation of sushi. It’s a delightful treat that’s perfect for children’s parties, dessert tables, or anytime you want to create something playful and unique. The colorful layers and creative presentation make these sweet treats as much fun to make as they are to eat!
Pure Comfort
There’s something nostalgically comforting about cotton candy – it instantly transports you back to carnivals and childhood excitement. These sushi-inspired candy rolls capture that joy while adding a creative twist. The soft, fluffy texture combined with the chewy candy elements creates a delightful sensory experience that appeals to the kid in all of us.
Ingredients
- 2 bags of cotton candy (preferably in different colors like pink and blue)
- 1 package of Fruit Roll-Ups or similar fruit leather (various colors)
- 1 package of gummy worms or Swedish Fish
- 1 package of sour straws or licorice laces
- 1 cup of marshmallows (mini or regular)
- Sprinkles for garnish
- White chocolate chips (optional, for “rice” effect)
- Green-tinted coconut flakes (optional, for “wasabi”)
- Orange-tinted white chocolate (optional, for “ginger”)
What You Need
- Wax paper or parchment paper
- Cutting board
- Sharp knife
- Small spray bottle with water (very light mist)
- Plastic wrap
- Serving platter
- Chopsticks for serving
- Small dishes for dipping sauces (chocolate or fruit syrups)
- Food-safe gloves (cotton candy sticks to hands)
Time to Cook
- Prep Time: 25 minutes
- Assembly Time: 15 minutes
- Setting Time: 10 minutes (if using chocolate)
- Total Time: 50 minutes
Steps to Make It
- Lay out sheets of wax paper on your work surface to prevent sticking.
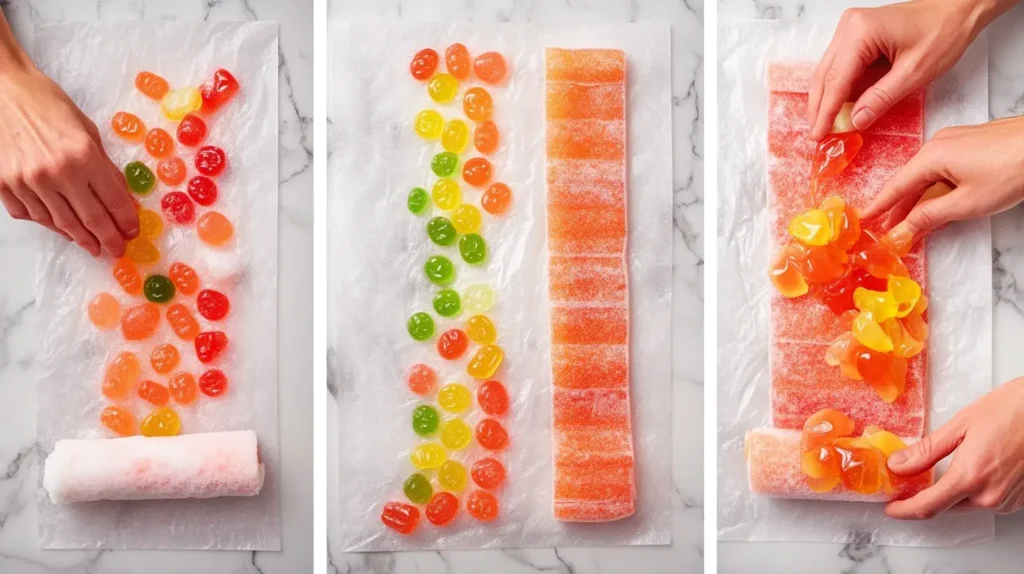
- Carefully unroll your fruit leather and lay flat on the wax paper.
- Gently pull apart cotton candy into thin sheets, maintaining its fluffiness.
- Layer the cotton candy on top of the fruit leather, pressing very gently.
- If using white chocolate chips for the “rice” effect, melt them and drizzle a thin layer over one portion of the cotton candy.
- Place your filling ingredients (gummy worms, marshmallows, or Swedish Fish) along one edge of the cotton candy.
- Using the wax paper to assist, carefully roll the fruit leather and cotton candy around the filling, similar to making a sushi roll.
- If the cotton candy is too dry and not sticking, use a very light mist of water from a spray bottle to help it adhere.
- Once rolled, use a sharp knife to slice into 1-inch pieces.
- Arrange on a serving platter with your “wasabi” (green coconut) and “ginger” (orange-tinted white chocolate).
- Serve with chopsticks and small dishes of chocolate or fruit syrup for dipping.
Make It Perfect
For the best texture and presentation, work quickly as cotton candy can shrink or dissolve if exposed to air or moisture for too long. The key is to handle the cotton candy gently to maintain its fluffy texture. If it becomes too compressed, it will lose its cloud-like appeal. For clean cuts, lightly spray your knife with non-stick cooking spray between slices.
Mix It Up
Try different cotton candy flavors and colors to create various themes – blue and white for a frozen party, pink and green for a spring celebration, or orange and black for Halloween. You can also experiment with different fillings like jelly beans, Pop Rocks for a surprising crackle effect, or small pieces of chocolate bars for added richness.
Perfect Partners
Serve these sweet sushi rolls alongside milkshakes presented in mini bubble tea cups with wide straws. A platter of fresh fruit with chocolate fondue makes a nice contrast to the candy offerings. For a complete dessert sushi experience, create “nigiri” by placing marshmallows atop rice crispy treats with a thin strip of fruit leather.
Busy Day Hero
This no-bake treat comes together quickly and requires no oven time, making it perfect for hot summer days or when you need a fast dessert solution. Make a bigger batch and let kids help with assembly – they’ll love being part of the creative process.
Work Ahead
While cotton candy is best used immediately after opening, you can prepare all your other components ahead of time. Cut fruit leather, prepare fillings, and set up your assembly station in advance. If you’re making the optional chocolate components, those can be prepared and stored in the refrigerator a day ahead.
Save Some For Later
These treats are best enjoyed immediately, as cotton candy will dissolve over time, especially in humid environments. If you need to store them for a short period, place in a single layer in an airtight container with parchment paper between layers, and consume within 2-3 hours for best results.
Everyone’s Happy
This versatile treat can be adapted for various dietary needs. Use vegan fruit leathers and plant-based marshmallows for vegan guests. For those avoiding artificial colors, look for naturally colored cotton candy and fruit leathers. The interactive nature of this dessert makes it fun for both kids and adults.
Good For You Too
While this is definitely a treat, you can incorporate some healthier elements by adding dried fruit pieces as fillings or using naturally colored and flavored cotton candy and fruit leathers that contain real fruit. It’s also portion-controlled, which helps with mindful indulgence.
Easy Clean Up
Working with wax paper means minimal mess, despite the sticky ingredients. To make cleanup even easier, wear food-safe gloves when handling the cotton candy and have a bowl of warm water nearby to quickly clean sticky fingers between steps.
Switch It Up
For a more sophisticated version, try using gourmet cotton candy flavors like champagne or rose paired with high-quality chocolate elements. You could also create cotton candy “temaki” (hand rolls) by shaping the cotton candy and fruit leather into cones and filling with assorted candies.
Simply Perfect
What makes this treat special is how it transforms familiar candies into something magical and unexpected. The combination of textures – from fluffy cotton candy to chewy fruit leather and gummy fillings – creates a multidimensional treat that’s as entertaining as it is delicious.
FAQs
Will the cotton candy dissolve if I make these too far in advance?
Yes, cotton candy is very sensitive to moisture and humidity. These treats should be made no more than 1-2 hours before serving, and kept in a cool, dry place.
Can I use homemade cotton candy?
Absolutely! If you have a cotton candy machine, freshly made cotton candy works wonderfully and offers more flavor options.
My fruit leather is too stiff to roll. What should I do?
Warm it slightly with your hands or leave it at room temperature for a few minutes. You can also microwave it for 3-5 seconds to make it more pliable.
How do I prevent my cotton candy from shrinking?
Work in a low-humidity environment and work quickly. Avoid touching the cotton candy with wet hands, and use a very light mist of water only if absolutely necessary.
Can I freeze these treats?
No, freezing would destroy the texture of the cotton candy. These are best made fresh and eaten immediately.
What’s the best way to serve these at a party?
Display them on a sushi-style serving platter with small cups of various dipping sauces. Add decorative chopsticks and bento-style dividers to enhance the sushi theme.
Where can I find colored cotton candy?
Specialty candy stores, party supply shops, and online retailers offer various flavors and colors of cotton candy. You can also find cotton candy at most carnivals and fairs.
Conclusion
Cotton Candy Sushi Swirl Candy brings together fun, creativity, and sweetness in one delightful package. Perfect for parties, special occasions, or just when you want to create something magical with your kids, these treats are sure to bring smiles all around. The combination of nostalgic cotton candy with a playful presentation makes this recipe more than just a sweet treat – it’s an experience that creates lasting memories. So gather your ingredients, embrace your inner child, and get ready to roll up some candy magic!

Cotton Candy Sushi Swirl Candy
Ingredients
- 2 bags of cotton candy preferably in different colors like pink and blue
- 1 package of Fruit Roll-Ups or similar fruit leather various colors
- 1 package of gummy worms or Swedish Fish
- 1 package of sour straws or licorice laces
- 1 cup of marshmallows mini or regular
- Sprinkles for garnish
- White chocolate chips optional, for “rice” effect
- Green-tinted coconut flakes optional, for “wasabi”
- Orange-tinted white chocolate optional, for “ginger”
Instructions
- Lay out wax paper on your work surface to prevent sticking.
- Unroll fruit leather and lay it flat.
- Gently pull apart cotton candy into thin sheets and layer over the fruit leather.
- (Optional) Melt white chocolate chips and drizzle for a “rice” effect.
- Arrange gummy worms, marshmallows, or Swedish Fish along one edge.
- Carefully roll the fruit leather and cotton candy around the filling, using wax paper for support.
- If the cotton candy doesn’t stick well, lightly mist with water.
- Use a sharp knife to cut into 1-inch sushi pieces.
- Arrange on a serving platter with “wasabi” (green coconut flakes) and “ginger” (orange-tinted white chocolate).
- Serve with chopsticks and dipping sauces like chocolate or fruit syrups.
Notes
- Work quickly to keep the cotton candy from shrinking or dissolving.
- Use a lightly greased knife for cleaner cuts.
- Customize flavors with different candy fillings.
- Best enjoyed immediately, as cotton candy melts over time.
- For a healthier twist, use naturally colored fruit leather and dried fruit fillings.